
This guide is dedicated to everyone in the guild and to my loving partner Terezi and daughter Kirezi - (as I always see this in different technical books hahah - LOL - Drama Mode) anyways this guide is a branch from my previous post about MVP Tactics - kindly check forum discussion here, before continue reading this guide, this is not complete, this is a bit lengthy but I hope you won't get bored reading this --- any ideas, critics, and suggestions are definitely welcome to improve this guide. Furthermore this guide is mostly composed of reiteration of my previous post and nagging during MVP hunting. Hence this will also serve as a good reminders on what to do and play your role carefully, and efficiently on each MVP raid. This guide at some point is not meant to be offensive or mean, but rather a reminder on what to work on. Making a mistake is definitely okay as long as we learn from it and try our best next time.
NOTE: This guide is confidential and should not be shared on other guilds or what not.
"A life spent making mistakes is not only more honorable, but more useful than a life spent doing nothing." - George Bernard Shaw
The fear of making mistakes can prevent you from trying anything new or moving out of your comfort zone. This is such a terrible waste of your skills and your talents and robs you from truly enjoying your life.
Introduction: This guide will be divided in four major (4) parts; different MVP based on difficulty, a reminder of MVP skills to watch out for, roles or strategy of each classes during MVP and different formation to tailor each MVP raid.
Reasons why MVP Party Fail for LOL - a Friendly Reminder:
- Giving Up - "Try & Try Until You Succeed" - a famous quote that definitely owns as long as you don't give up it will definitely pave way for success, though evaluating one's strength is very important and knowing the party's capability and limitation, if its not possible today, try again tomorrow.
- I don't have SQI, Lord Kaho's Horn, Celebration Ring, etc. - We killed all MVP in official pRO and iRO with "junks" or "throw away items" considered in tRO, gears is not the main reason that limiting a player to survive and play their character in a party or group - gears will definitely help, but what are gears or SQI if you can't utilize your character skills or team work is not practice. Skills is always greater than Gears (Skills > Gears).
- MVP!!! -" I want to be the MVP!" - rush in, spam skills - die in 3 seconds - no point in joining an MVP raid if you will act selfishly on your own, this is also true if you are trying to survive on your own or focus on your own survival than playing your role to support one another - party is made to support everyone's class and cover's each other weaknesses. Variety of classes are made to support each other, not to outclass each other.
- Panic! - "I don't want to die" - leaves tanker alone or the group and fly wing - this is similar to posted above, saving yourself and neglecting your duty will definitely mess up the battle formation. Though it is essential to survive as much as possible to prevent a party from wiping out. Believing on your team mate is also important as trust merits team play and makes way to a solid team work.
- Lack of Supply - as discuss on Survival Kit - Adventuring 101 - it is imperative that everyone are "Always prepared" - all classes should bring hp / sp recovery potions, Yggdrasil Leaf - unless your a Priest, Green Potions / Panacea - depending on what MVP to kill - nothing is more stupid than going out to a battle without an ammunition or going to an exam without a pen.
- Not Knowing thyself - all heroes die in the end, don't pretend to be a hero if you will die insignificantly - learn why your class or character exist, play you role and have fun.
- Every second counts - dallying on an important raid is a no no, especially true to MVP that are mostly targeted by other party - --each second counts, get moving as soon as the MVP spawns.
- MVP is weak - "we can do this!" - ignoring mobs and died from mobs in 10 seconds - another fatal mistake, creating mobs will mostly make the raid difficult, if your class is built to nuke, its important to nuke and clear the mob most of the time rather than focusing on killing an MVP and ignoring the mess around you.
- Why You No Read? - what's the purpose of chat-box if you don't read - coordination is important, same goes with following instructions swiftly and accordingly. Team Play is always a must! - Listening vs Hearing
Normal MVP Monsters:
Normal MVPs spawn a set amount of time after the previous one was
defeated. For example, if Amon Ra is defeated at 11:00, it will spawn
again at 12:00. If an MVP spawns in multiple places, the two times are
independent of one-another and the respawn period may be different.
Below is a list of all normal MVPs, where they are located, and the time
that needs to elapse before it will respawn. In addition, links are also provided so you can carefully study the MVP weaknesses and strength - difficulty ranking is also made for beginners to try, hone and test their skills.
Low Difficulty
- Eddga is located on Payon Field 10 (2 hours) and Balder Guild Dungeon (8 hours)
- Tao Gunka is located on Beach Dungeon, West Cave (5 hours)
- Amon Ra is located on Morroc Pyramid B2F (1 hour)
- Dracula is located on Geffen Dungeon 2 (1 hour)
- Golden Thief Bug is located on Prontera Culvert 4 (1 hour)
- Phreeoni is located on Morroc Field 15 (2 hours)
Medium Difficulty
- Atroce is located on Rachel Field 02 (4 hours), Rachel Field 03 (3 hours), Rachel Field 04 (5 hours), Veins Field 01 (5 hours), Veins Field 02 (6 hours)
- Lady Tanee is located on Ayothaya Dungeon 2 (7 hours)
- Mistress is located on Mt. Mjolnir 4 (2 hours)
- Moonlight Flower is located on Payon Cave 5 (1 hour)
- Stormy Knight is located on Toy Factory 2 (1 hour)
- Osiris is located on Pyramid 4F (1 hour)
- Drake is located on Sunken Ship 2 (2 hours)
- Pharaoh is located on Sphinx 5 (1 hour)
- Hatii is located on Lutie Field (2 hours)
- Turtle General is located on Turtle Island 4 (1 hour)
- Maya is located on Ant Hell 2 (2 hours) and Valkyrie Realms Guild Dungeon (8 hours)
- Gopinch is located on Dremuchi Forest (2 hours)
- Memory of Thanatos is spawned by the completion of the Thanatos Tower Quest.
Mid-High Difficulty
- Doppelganger is located on Geffen Dungeon 3 (2 hours) and Luina Guild Dungeon (8 hours)
- Egnigem Cenia is located on Somatology Laboratory 2 (2 hours)
- Kiel-D-01 is located on Kiel Dungeon 2 (2 hours)
- Orc Hero is located on Geffen Field 12 (1 hour) and Geffen Field 2 (24 hours)
- Evil Snake Lord is located on Kunlun Dungeon 3 (94 minutes)
- Samurai Specter is located on Amatsu Dungeon 3 (91 minutes)
- Vesper is located on Juperos Core (2 hours)
- Gloom Under Night is located on Rachel Sanctuary 5 (5 hours)
- White Lady is located on Louyang Dungeon 3 (117 Minutes)
- Fallen Bishop is located on Cursed Monastery 2 (2 hours)
- Tendrilion is located on Splendide Field 3 (60 Minutes)
- Queen Scaraba on Scaraba Hole Dungeon 02 (130 Minutes)
High Difficulty
- Baphomet is located on Labyrinth Forest 3 (2 hours)
- Dark Lord is located on Glast Heim Chuchyard (1 hour) and Britoniah Guild Dungeon (8 hours)
- Detardeurus is located on Abyss Lake 3 (3 hours)
- Lord of the Dead is located on Niflheim (133 minutes)
- Orc Lord is located on Geffen Field 10 (2 hours)
- RSX 0806 is located on Mine Dungeon 2 (125 minutes)
- Ktullanux is spawned by using 4 Freezing Snow Powder (obtained via the Ice Necklace Quest) or 4 Ice Scale (obtained by defeating Ktullanux previously) to put out the four sacred fires on Ice Dungeon 3. Once defeated, Ktullanux cannot be resummoned for another 2 hours
- Hardrock Mammoth is located on Manuk Field 3 (240 Minutes)
NOTE: MVP listed above has damaging AoE Skills like Pulse Strike and Earthquake that can easily wipe out a party if they are not careful enough.
Extreme Difficulty
- Assassin Cross Eremes
- High Priest Margaretha
- High Wizard Kathryne
- Lord Knight Seyren
- Master Smith Howard
- Sniper Cecil
- Naght Sieger (Floor 101) and Entweihen Crothen (Floor 100) spawn in the Endless Tower instance.
- Nidhoggur's Shadow spawns in the Nidhoggur's Nest instance.
- Valkyrie Randgris is located on Odin Shrine 3 (8 hours)
- Wounded Morocc is located on Dimensional Gorge (12 hours)
- Beelzebub is located on Cursed Monastery 3 (12 hours)
- Ifrit is located on Thor's Volcano 3 (11 hours)
MVP Skills:
What usually wipes out an MVP raid or party are those nasty AoE skills of MVP - overpowered Brandish Spear, Earthquake, Pulse Strike, and much more, to prevent this from happening, its best that we know how this skill works and how to negate it or at least reduce the damage as much as possible. The following skills below are the most deadly skills if not properly negated by skills or block / reduce by gears.

1. Earthquake
- Magical Multi-Target Splash Attack
- Levels: 10
- Target: Self
- Element: Neutral
Massive neutral element magical damage based on the monsters physical
attack power, dealing 3 hits in rapid succession. Each hit is
calculated separately, like the skill Water Ball.
Damage can be reduced by Raydric and Ghostring cards. The damage
dealt is split across all players hit by the skill. Has a visual effect
that looks like cracking earth.
Reducing Damage
The following skills do not block Earthquake:
The following skills can block one hit of Earthquake:
Note that these skills can only prevent the first hit, leaving them vulnerable for the next two hits.
Cards and equipment that reduce Neutral element or ranged damage can help reduce damage, amongst them:
- Asprika
- Deviling Card
- Ghostring Card
- Golden Theifbug Card
- Raydric Card
- Alligator Card
- Horn Card
- Racial reduction cards such as Thara Frog
Notes
- Having the most players possible in the area is ideal, as the damage will be more spread out - as tested with our RSX raid - once an MVP will start to cast Earthquake which usually has a casting bar, everyone should stick / compress together at one point - ideal position would be if a boss is being tanked with a devo, everyone should stick together to the Paladin's cell.
- When the monster using the skill goes into Power Up, the Earthquake damage is also multiplied by 3x.
- Wearing a Golden Thiefbug Carded equipment will enable the user to avoid being hit.
- Damage is recalculated on each of the three hits. If characters die during the first or second hit of Earthquake, the damage of subsequent hits will no longer be divided amongst them.
2. Pulse Strike
A wave is shot out that deals strong physical damage to all targets in a
15x15 area and knocks them away from the caster 7 cells. The visual
effect of this skill looks similar to that of the Assassin Cross skill
Meteor Assault.
Notes
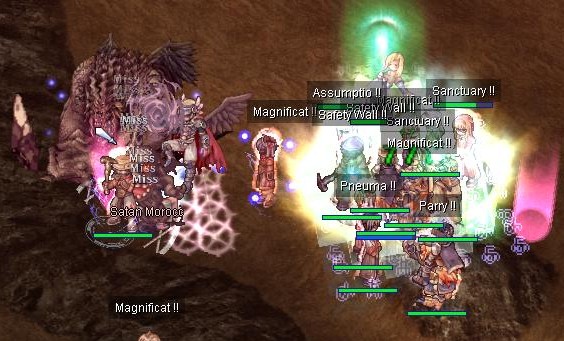
- You can avoid the damage of this skill using Safety Wall when 4 cells close to the monsters and Pneuma when 4 cells far from the monster. A high flee can "dodge" the hit too. Therefore, Pneuma should always be casted at the back area during an MVP raid with a Devo Paladin, this is true to most AoE physical or range skills, SW will never save you unless you are within 4 cells from the target.
3. Hell's Judgement
- Area-of-Effect Offensive Skill
- Levels: 10
- Target: Self
An area of effect skill that causes physical damage and curses all players in an 29x29 area. When cast, all players struck will see the death animation over their heads.
Notes
- Same with Pulse Strike notation. You can avoid the damage of this skill using Safety Wall when closer than 4 cells to the monster, and Pneuma when more than 4 cells away from the monster. Having enough flee can enable the player to "dodge" the hit too.
As a general rule in the thumb, Priest should always cast Pneuma at back section.
Classes Roles:
This section will discuss skills that are not efficiently utilize as observe with different MVP Raids we have went through and different PvM party.
- Charge Arrow - this is a good way to repel mobs and lay trap after to disable stray mobs
- Quagmire - useful skill to control mobs
- Sanctuary
- Assumptio
- Lex Aeterna
- Pneuma
MVP Party Formation:
 If you've played chess the most important aspect is the opening -- a bad opening and a possible wrong move will easily determine who's the winner or not, just like in any game, every single step is important and this definitely applies to MVPing, any possible wrong move will wipe the party out, hence every step should be taken carefully.
The most basic formation that I will name "Seige" will be a tanker (front liner) luring the MVP to position everyone and taking all hits, whilst everyone at rear section are compressed altogether (this includes support class and damager class) - just like a Seige all attacks are focused at one point hence the tanker will serve as the target point of all attacks, this way Pneuma is fully utilize as it covers 3 cells range from the based cell, sanctuary is also maximize and SP is not wasted. Furthermore if possible AoE Skills will land everyone can be aided efficiently and easily instead of resurrecting each members at different point of the map, if a High Wizard is also part of the team, any possible mobs in the map that will break the formation can be easily wipe out which will make things easier in contrast to everyone running around trying to save their lives and making it more difficult to clear the mob, what make it worst is that if you are running around in circles you are luring more mobs and making it more messy than before.
Tips to maintain a solid formation:
- Trust your team mate to do their respective job - if a High Wizard is tasked to clear the mob, then definitely stand on your ground and continue doing your respective task.
- Auto attack should be off, as observed on our party, sometimes there are tendency that you will move in the front line, which will let the MVP changed target which results to the party being wipe out
- If someone died, Priest should automatically resurrect the one who died, this is important to maintain the party's survival rate to 90%. If priest is busy due to MVP being a bitch - use your initiative to resurrect the fallen member right away
- If High Wizard is the one doing the damage to MVP and a mob is trying to get inside the rear section, High Wizard should clear he mob first before killing the MVP, hence if there are two High Wizard in the party it would be much easier as task can be divided whilst the other one is focus in killing the MVP

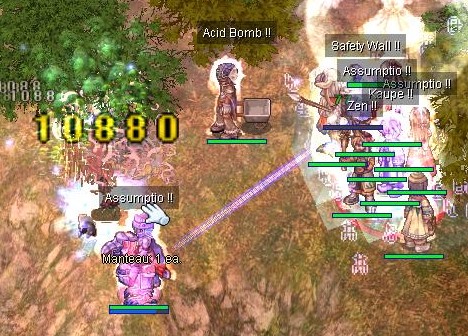
The second formation is almost the same with the other one, except one or two support class or damager is at the back section of the guys that are compressed together or a bit separated from the compress group. Basically this plan will work better if the party is full as if in-case everyone got wipe out from tanker to the rear section, the other two at the further section will be able to rescue everyone.
As illustrated in the picture at the right side a priest is at the furthest end whilst everyone are at the middle section. though other members are a bit spread out.
Last formation is free flowing, this will be based on the situation like other party or competitors are luring the mobs to our team or too many parties are killing the MVP at the same time, at that point survival is number one priority and resurrecting everyone at all cost is the main priority, breaking the formation and using other party as an advantage is a must, hence initiative, flexibility, and to adapt on each situation even without any prior notice are important.
Last Few Tips:
- Recording - Grab a pen and a piece of paper to take down the time the last MVP was killed. Jot down the time immediately after the MVP died.
- Routes - Some maps where the MVP spawns are just too HUGE or TOO complicated. Route out your search path, and see which is the fastest route for the amount of area covered.
- Spawn Spots - Some MVPs like Amon Ra, Drake, FBH and Turtle General has a static/regular spawn spot.
Noblesse Oblige
0 comments:
Post a Comment