Hi Team,
Later tonight or morning on other countries - 8 -9 PM GMT +8 we will attempt to kill Satan Morroc, please do the quest as soon as possible in accessing gorge, this will be a tough or possibly an easy battle hence everyone's cooperation and presence is highly needed.
How Satan Morroc Works
There are two versions of Satan Morroc, a quest spawn, and an MVP version. Think of this like the Kiel quest, in order to gain access to the map in which you kill the MVP version, you must take down the quest boss. Unlike Kiel however, the quest boss is considerably harder than the MVP. Gravity recommends that this battle be handled by a large group of players (recommended 20 players). Everyone who is involved with killing Satan Morroc gets experience (from both the MVP and from the quest), a reward item, and the ability to go to the map with the MVP.Since Morroc's destruction, the area east of Morroc is off limits. You need to sign up with the Continental Guard to enter the field. You will need 30 Live Coal and 50 Glacial Hearts to join. With the continental guard papers, you can then talk to the guards outside east Morroc and be moved to the Satan Morroc Field.
At a specific point on the map, anyone doing the quest can trigger Satan Morroc to spawn. Satan Morroc will appear at a set location on the map close to the trigger location at one of the holes in the ground. From spawning, Satan Morroc must be killed within 90 minutes or he will disappear and need to be re summoned. When killed, players can go to the original summon location and obtain a Piece of Morroc's Skin. There is no limit to the amount of players that can obtain the skin, but they must be on the map when he is defeated because the field becomes inaccessible for 6 hours afterwards.
Players already haven killed Satan Morroc and obtained the quest reward are unable to return to this original field. Instead they can chose to enter a second field. Here, the MVP boss monster 'Wounded Morroc' will spawn every 12 hours.
The Rewards
When you bring the skin back to the Continental Guard leader, he will reward you with 2 million base experience, and give you your choice of accessory. These accessories I believe are account bound (they might be character, not 100% sure). |
Continental Guard Seal [1] HP + 50. Attack Speed + 3%. Weight: 5 Min Lv: 80 Job: All Except Novice |
 |
Rune Charm Stone [1] SP + 50. Cast Time - 1%. Weight: 5 Min Lv: 80 Job: All Except Novice |
 |
Death Loop [1] Critical + 5. Weight: 5 Min Lv: 80 Job: All Except Novice |
The Battle Versus Satan Morroc
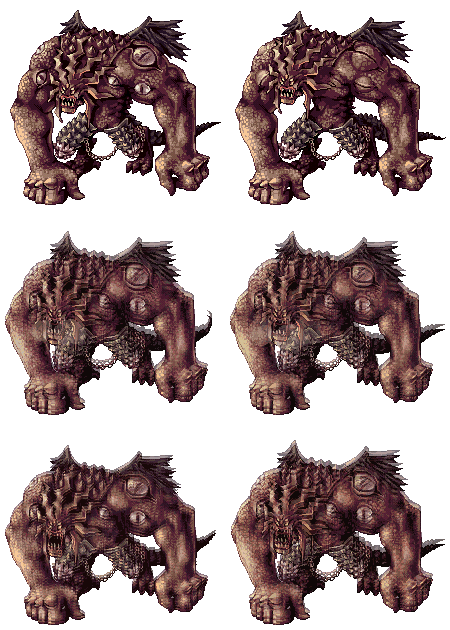
| Name | Satan Morroc | Race | Demon | Lv | 99 | ATK | 32,000 ~ 32,001 |
| Image | 
| Element | Shadow 4 | HP | 20,000,000 | Def | 29+30 |
| Size | Large | Exp | 6,700,000 / 4,500,000 | MDef | 65+265 | ||
| Skills | Dragon Fear, Speech, Area Hell Power, Area Stun, Earthquake, Pulse Strike, Area Petrification, Meteor Storm, Vampire's Gift, Area Soul Drain, Evil Land, Area Sleep, Hell Power, Hell's Judgement, Stone Curse, Firebolt, Frost Diver, Jupitel Thunder, Teleport, Pneuma, Heal, Summon Slaves (1 of each morroc spirit), Magnetic Earth, Break Shield | ||||||
| Stats | 160 Agi, 30 Vit, 250 Int, 180 Dex, 50 Luk 100% Hit 279, 95% Flee 354 | ||||||
The actual fight consists of a series of stages, where Satan Morroc will begin using new skills. Morroc, unlike other monsters in the game will actually use speach, which will appear in red text above his head and in the chat window. You can identify what types of attacks he's using by what he is saying. Note that the dialog is probably not correct for iRO, but it should be similar enough that it can be identified.
Stage 1: Initial Stage
| Skills Available: | Summon Slaves, Call Slaves, Magnetic Earth Lv 1, Shield Break Lv 10 |
| Dialog: | Initial Engagement - "Weaklings! Challenge me if you have any courage!" Summon Slaves - "My loyal servants! Welcome them with painful death!" |
In the initial stages, Satan Morroc doesn't do much on his own. His only real power here will be from his slaves. At this point in the fight, it would be best to determine how you wish to handle his minions. His slaves act independantly of Satan Morroc, and cannot teleport if rudely attacked. The following are the 4 slaves of Satan Morroc.
 |
Morroc's Shadow (Human Type) Demon/Undead 3 143,000 HP 3,400 ~ 5,000 Attack Attacks fairly quickly. Uses critical wounds 4, and area silence every 20s. |
 |
Morroc's Shadow (Golem Type) Demon/Shadow 3 190,000 HP 3,500 ~ 5,100 Attack Uses area bleeding, a powerful Magnum Break, and summons a pack of 6-7 instant-detonating constants every 10 seconds. At 10% HP it will attempt to use Earthquake Lv 1. |
||
 |
Morroc's Shadow (Spirit Type) Demon/Ghost 3 150,000 HP 3,000 ~ 4,025 Attack A supportive monster. Will assumptio monsters in range and spams 9999 heal every second. |
 |
Morroc's Shadow (Angel Type) Angel/Shadow 1 190,000 HP 7,000 ~ 8,600 Attack Very fast attacking. The only morroc monster that is not demon type. Uses slow cast, pulse strike, dispel, grand darkness, and magic mirror. At low HP it will use two hand quicken. Also has a 1% chance to cast Exile. |
Stage 2: Magic Combo
| Active HP: | 80% HP Remaining |
| Cooldown Time: | 20 Seconds |
| Skills Available: | Stone Curse 10, Firebolt 10, Frost Diver 10, Jupitel Thunder 10 |
| Dialog: | "Impressive! I wonder how far your recklessness will take you." |
When Satan Morroc hits 80% HP, he will do a magic combo, using Stone Curse 10 + Firebolt 10, followed by Frost Diver 10 + Jupitel Thunder 10. Because Satan Morroc has a very high amount of INT (250), you can expect this to hurt... a lot. His MATK is 1475 - 2750. As you can imagine, this can result in a fairly painful attack. He will perform this attack every 20 seconds.
Stage 3: Hell Combo
| Active HP: | 60% HP Remaining |
| Cooldown Time: | 35 Seconds |
| Skills Available: | Area Sleep 5, Hell's Power 1, Hell's Judgement 5 |
| Dialog: | "I almost pity how outmatched you are against me." |
At 60% HP, Satan Morroc will use Area Sleep, followed by Hell's Power on the tank, and then Hell's Judgement. Hell's Power is a skill that prevents a player from being resurrected for 3 minutes. Because of Satan Morroc's attack power, Hell's Judgement can cause a devastating attack on the party, more so after he uses Area Hell's Power later on. There is aproximately 2 seconds from when he first announces this combo and uses area sleep till Hell's Judgement activates.
Stage 4: Vampire Combo
| Active HP: | 50% HP Remaining |
| Cooldown Time: | 50 Seconds |
| Skills Available: | Vampire's Gift 9, Area Soul Drain 10, Evil Land 10 |
| Dialog: | "It's time to finish the game!" |
A dangerous combo. Vampire's Gift deals 400% physical attack to everyone on screen and absorbs that damage as HP that heals him. Area Soul Drain will remove the majority of the remaining SP from players in range, and Evil Land will constantly hit players on screen for 666 damage every second causing blind to everyone. Evil Land can be removed via Ganbantein, but the other skills must simply be defended against.
Stage 5: Area Attack Combo
| Active HP: | 40% HP Remaining |
| Cooldown Time: | 1 Minute |
| Skills Available: | Pulse Strike 5, Area Stone Curse 5, Meteor Storm 5 |
| Dialog: | "This is how you attack? Watch and learn, weaklings!" |
Other than the area stone curse, this isn't a very effective attack. Only occuring once a minute, the pulse strike may hurt some that are close to Morroc and the Stone Curse can cause problems among the party, but Meteor Storm is not high enough level to likely strike anyone who becomes petrified.
Stage 6: Earthquake
| Active HP: | 30% HP Remaining |
| Cooldown Time: | 3 Minutes |
| Skills Available: | Area Hell's Power 1, Area Stun 5, Earthquake 10 |
| Dialog: | "You worthless humans. Your so-called holy powers have no effect on me!" |
The most dangerous phase of the Satan Morroc battle. Area Hell's Power will inflict everyone on screen with Hell's Power status, shown by a purple skull icon on your buff list. This effect lasts 3 minutes, and durring the time, Ressurection (and Kaizel) will fail. Effectively this means that party members must prevent dying if they wish to continue fighting. This is rather unfortunate, because right after he uses it, he will use Area Stun, followed by Earthquake. Satan Morroc uses Earthquake 10, meaning its aproximately 2x the damage of regular earthquake. On the plus side, since Satan Morroc does not use Power Up, it would make his Earthquake aproximately as powerful as Ifrit's EQ (the MVP version with lower attack is roughly the same as Randgris). If you have a strong enough party to survive this attack, you can rest knowing he only uses it every 3 minutes.
This is the last of his attack forms, from here on out, you've simply got to survive his attacks and burn him down.
Stage 7: Talk
| Active HP: | 10% HP Remaining |
| Cooldown Time: | 10 Minutes |
| Skills Available: | N/A |
| Dialog: | "Oh, you're stronger than I thought!" |
Simply a text trigger, which helps you know how much HP he has remaining (2m for Satan Morroc, 1.5m for Wounded Morroc).
Stage 8: Almost Dead
| Active HP: | 10% HP Remaining |
| Cooldown Time: | 10 Minutes |
| Skills Available: | Dragon Fear 10 |
| Dialog: | "No, ths can't be happening! I'm Satan Morroc, Demon King of Destruction!" |
Another text trigger, this time accompanied with Dragon Fear.
Key Strategy in killing Satan Morroc:
- Kill two (2) slaves - Angel and Spirit Type
- Tank - Body Steel with Devotion - everyone stay at back section with Pneuma and Sanctuary, HP keep buffing and healing devo Paladin
- High Wizard - Ganban, Quagmire, Clear Mob
- Damager - Champions, Sniper, Creator
- Extra Paladin - Gospel
- Gypsy - Service For You
- Clown - Support
Thank you.
Noblesse Oblige.

0 comments:
Post a Comment